Week 10 - Applying Presentation Feedback
- meekin-s
- May 7, 2023
- 4 min read
Updated: May 18, 2023
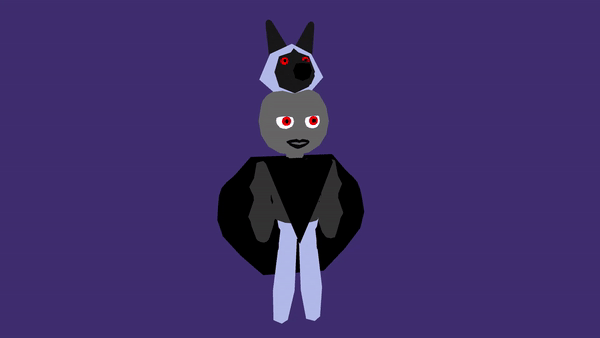
For this week we presented our presentation in class to Holly. She was able to go through all of our models and give us feedback. We were able to take down notes from other teams and apply them to our own models. When it came to Ragnarök Roki's presentation we got a lot of feedback.
For my character Skye, I had to make the model look like my character drawing as the proportions were very off. I then imported the nose and cut the wolf's head to make it more like my first concept with it looking more like a baseball cap.


Arms
The arms were very pointy when I tried to do the creases to make the jumper baggy. In order to change this I made a new soft cube, selected the bottom vertices and moved them out. I then scaled the top vertices in order to make the arm piece. For the forearm, I made a soft cube and stretched it out. I then flattened the hands as they were very thick.


Fur
I then was able to make the fur above the gloves. To do this I made a soft cube and scaled it on the red axis. I then made a plane and use the multi-cut tool. Once I cut out a shape I then placed it over the soft cube. I then duplicated them 4 times. I then duplicated it again and selected half of the faces and then deleted them. I then squashed them on the red axis and then placed them around the side of the soft cube.


Face
Another note from my feedback was to fix the face. When using the clean-up tool the topology was very off. In order to fix this I used the tutorial that I did in week 3. I imported an image of Tove's model. I then places a circle that was bigger than the image. I then made it live and used the quad draw tool to place vertices. Once I placed the vertices I then used the side profile image and then overlayed the vertices to where they are on the image.


I turned off live and I was able to make a surface that is 3d looking. I then added the nose and then added a light grey lambert. I then selected the bottom faces of the nose and applied a dark grey colour. I also did this with the mouth.
I then used the eyes from earlier and made sure that they were evenly spaced.
For the eyebrows, I used the live and quad draw tool on Tove's eyebrows. Once I got 1 eyebrow I duplicated them and flipped it. I then placed the eyebrows above the eyes and moved some of the vertices into the mesh so that there are no gaps left.


I then placed a soft cube behind the face and it is the same size as the face. I made it the same colour as the face and I made sure that the soft cube didn't clip through the face.
Cape
To make the cape I made a plane and selected some of the vertices and rotated them 90 degrees.


I then used the multi-cut tool and cut out a triangle on the front face. I then selected some of the vertices and pulled them out to make a baggy look on the cape. I then added a black lambert on the cape.


Boots
To make the Boots I imported Tove's model and made her shoes live. I then used the quad draw tool and placed vertices where they were placed on the model. I then rearranged the vertices around to make the shape of a shoe. I then made the shoe unlive and selected my new surface and added a black lambert. I then selected the bottom faces and made them white to separate the sole from the shoe. I then placed a cylinder onto the shoe model and scaled it to make it the appropriate size.


I then duplicated the fur that I made of the arms and then rotated them 90 degrees and placed them above the boot.

Chain
The environment artists thought it would be a good idea for me to add a chain to my character to make the character feel connected to the scene. To make the chain I made a soft cube and squashed it. I then selected the top and bottom faces and deleted them. I then placed the model around the character's boots. I then selected the vertices and moved them into the mesh to make the cube look like it is connected to the leg. I then was able to go onto codecs and download the chain model that was provided by the Environment team. This was very helpful as if we are to connect the chain to the one in the environment it will match with the pattern.


Hood
To make the hood I made a soft cube and scaled it to make it bigger than the face. I then selected some of the faces at the front and then deleted them. I then selected the vertices at the bottom of the soft cube and I then made sure that they were connected to the cape.

Hair/Tooth
To make the teeth I imported an image of wolf teeth as a reference. I made a cube and made it live and then Used the quad draw tool to draw all over the image. Once I got the image I then scaled it to make it 3D-looking and I then made the Lambert a faded yellow colour. I then duplicated it and made the teeth different sizes to add variety.

I duplicated the teeth and then assigned a black Lambert. I then placed them above the character.

Wolf Baseball cap
To make the wolf cap I scaled the wolf to be a bit bigger. I then selected the bottom faces of the Snout and then deleted them. I then added the teeth in.

Proportions
I imported my concept art into the Maya scene using the create-free image plane. I then scaled all my shapes to fit the proportions. For the face, I scaled it down to make it less of a circle and more like an oval. This is my final image of the character

I then used Mesh/Clean-up tool to help me find any uneven topology with more than 5 faces.
This feedback was extremely useful as I was able to completely transform my character within a week and a half. I am very happy with how the character turned out.


Comments